How to Install A Vinyl Gate Latch
Read More: Vinyl Fence System Overview

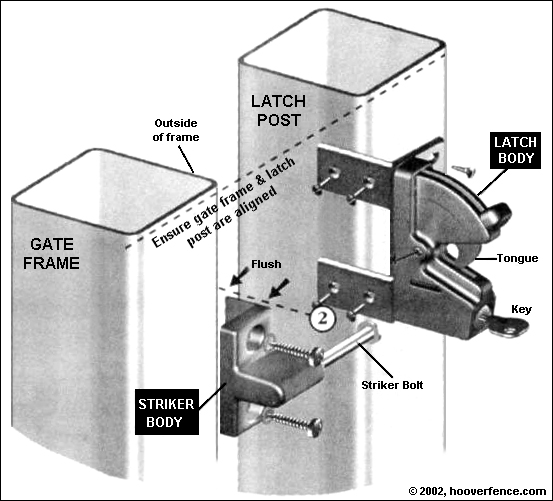
Figure 1
Installing a latch on a vinyl gate:
Determine location of latch body on fence post.
Mark and drill (6) 1/8" pilot holes.
Secure latch body to fence post with (6) # 8 x 3/4" screws.
Determine the location of striker body to gate upright.
Mark and drill (6) 1/8" pilot holes.
Secure striker body to gate upright with (4) # 8 x 3/4" screws on side leg and (2) # 8 x 1" pan head screws with 2 washers on front face.
Note: for maximum strength hardware must be fastened in 2 directions as shown.

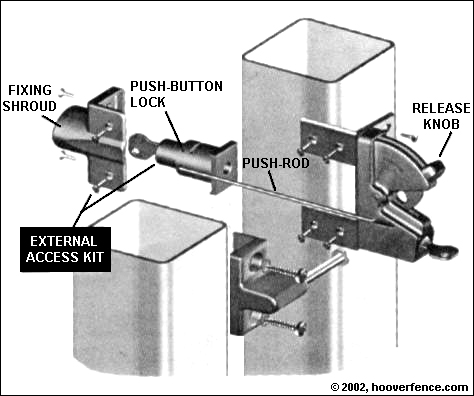
Figure 2
Install External Access Kit:
Open release knob.
Hold steel rod in vertical position.
Feed large return end of steel rod through slot in side of latch body.
Release knob.
Insert small return of steel rod through small hole in push button lock.
Slide the fixing shroud cover over the push button lock.
Ensure the push rod is level and not binding on the post. Mark hole locations on post.
Drill (4) 1/8" pilot holes.
Secure fixing shroud to fence post with (4) # 8 x 3/4" screws.
Note: Two steel push-rods are included to fit either a 4" or 5" post application.
Note: Your latch may or may not look like this latch. Gate hardware can vary. All hardware includes installation instructions specific to that hardware. Follow the instructions for your latch.


