1-800-355-2335 |
Mon-Fri: 7:30am - 4pm EST |
Contact Us
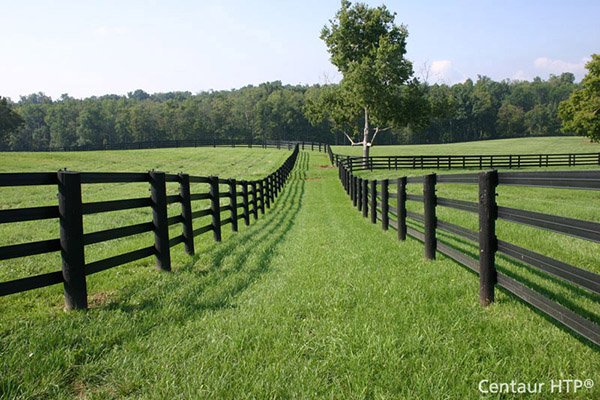
How to Install Ornamental Aluminum Fence
Shop: Ornamental Aluminum Gates
More Information: Ornamental Fence System Overview
Before You Begin:
- Obtain necessary zoning and building permits. There may be local zoning or deed restrictions pertaining to height and type of fence. Check out property line setback requirements.
- Find surveyors pins if the fence is to be located near property lines or have the lot surveyed.
- Measure fence footage and locate gate placement.
- Call 811 to have underground utilities marked prior to digging. One easy phone call to 811 starts the process to get your underground utility lines marked for free. When you call 811 from anywhere in the country, your call will be routed to your local One Call Center. Local One Call Center operators will ask you for the location of your digging job and route your call to affected utility companies. Your utility companies will then send a professional locator to your location to mark your lines within a few days. Once your underground lines have been marked, you will know the approximate location of your utility lines and can dig safely, because knowing what's below protects you and your family.
- Always call 811 before starting any digging project!
- Purchase Ornamental Fence From HooverFence.com - Shop Ornamental Aluminum Fence
Tools and Materials Needed:
- Newly Purchased Ornamental Fence from HooverFence.com
- Stakes
- Masonry String
- Measuring Tape
- Marking Paint
- Small Sledge Hammer
- Rubber Mallet
- Post Hole Digger
- Level
- Concrete Mix
- Drill and Drill Bits
- Hacksaw or Reciprocating Saw
- Marker
- Screwdrivers and Bit Drivers
- Wood Scraps/Shims
Unwrapping and Inspecting Fence Shipment:
The first thing we recommend is that you carefully unwrap and inspect your shipment to verify that you have all of your materials. Make sure to go over and read all of the instructions at this time. While the installation of the fence is relatively easy, this online instruction guide should eliminate any guesswork. If you have any questions or problems installing the fence, please give us a call.
Establish Fence Lines:
You will establish the future fence line by using the stakes and string to stake out the area to be enclosed.
Start by driving stakes a foot or two away from where you want corner and end posts to be located; this will allow you to drill/ dig holes without obstructions. It may also allow you to 'drop' the string while excavating for fence post holes. Be careful not to bump or move stakes. If you remove the string to excavate holes, take care to re-stretch the string line back the way it was prior to removing.
Stretch masonry guide string tight between these stakes. This string will represent the location of the fence and serve as a guide string as you set posts. Posts will be set in concrete 1/8-1/4" from string line.
Intermediate stakes may be required for longer stretches of fence. Be sure to pull string taut as string which sags or moves with the wind will cause posts to be set incorrectly. Keep in mind, the fence can only be as straight as the guide string.
Locate gate posts first and mark their location with upside down post hole marking paint. Next measure each stretch of fence. Ornamental fence line posts are typically spaced a maximum of six feet apart but check your style for specifics. For aesthetic reasons, space posts evenly. You may need to cut some sections down in length during installation. This is a good time to plan that out and shift your layout if necessary.
Creating Square Corners Using the 3-4-5 Method:
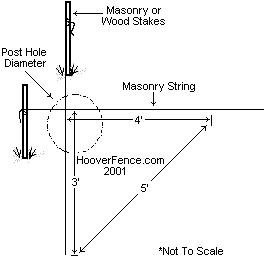
- Stretch string down the two adjacent sides as shown in drawing.
- Measure and make mark 3' down on one line.
- Measure and make mark 4' down on other line.
- Measure diagonally between the two marks and adjust lines to achieve 5'.
Note: For greater accuracy, use measurements in multiples of 3-4-5, such as 6-8-10, etc.
Layout Materials:
Once the layout has been established, and post locations marked, you should be safe to lay the materials out for easy access as you work down the fence line. The best step is to start with the posts, and lay them near the proposed hole locations, but out of the way of where the work will be happening. You can also lay your sections out in the same manner.
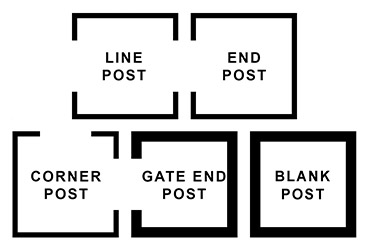
There are four configurations of posts commonly used in Ornamental Fence Installations:
- Line Posts - Punched on Opposite Sides to Accept Fence Rails.
- End Posts - Punched on One Side Only to Accept Fence Rails.
- Corner Posts - Punched on Adjacent Sides to Accept Fence Rails at 90° Connections.
- Blank Posts - Not Punched - Typically Used with Gates or Stair Stepping. Connections Made with Brackets.
Dig Holes and Set Posts:
You will want to begin setting posts at the gate locations. If you have no gates on the project, then start with an end post.
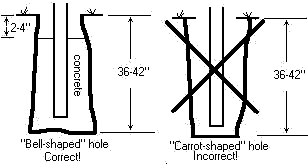
Post holes can be dug by hand with Post Hole Diggers and Spud Bars, Small One or Two-Man Augers, or Skid Steers with Auger Attachments. You will size your auger bit according the the post size, typically 3 times the diameter of the widest point on the post. In this instance, since the posts are square, you will measure diagonally from corner to corner. This measurement will be the size of the top diameter of the hole. You should make sure to bell out the bottom of the hole - you never want a "carrot" shaped hole. Frost will surely heave the posts out of location.
Make sure to clean out all loose dirt from every hole before filling with concrete.
Once the Gate or End/Corner Post hole(s) are dug and ready to go, you will want to set your post in the hole and fill the hole with concrete to about 2" below grade (ground level). Make sure that the post is parallel to the masonry line and about 1/8" off of the line. It is important to make sure that the posts aren't twisted because it will create issues with installing the sections and gates.
Once the hole is filled, you will tamp down the concrete and make sure that the post is plumb and that the gate posts are spaced properly to accommodate the gate. It is best to take a couple measurements between the posts at the top, and middle, to make sure that you have it in the correct position. The proper operation of the gate depends upon the correct installation of the gate posts - make sure they are plumb!
Repeat this process for all other gate posts that are not in the same fence line. Gate posts that are in the same line of fence will be installed when the fence reaches their location.
You will now begin to install the section and line posts. You will want to begin digging the holes for the line posts. We suggest digging one or two holes ahead of yourself until you are comfortable with the process. Once you build your confidence, you can dig up to 8 posts away from you.
To assemble the fence, slide the horizontal rails of a section into the punched holes of the first post that was set as far as the notched hole will allow. Place a line post into the next post hole, and slide the line post onto the horizontal rails as far as possible. Screw the sections to the posts with supplied self-drilling screws. Caution: Do not over tighten the screws, you can and will break them. If you are using a drill, adjust the clutch to prevent the screws from denting and marring the finish.
Next you will pour concrete around the post and make sure that the post is plumb and aligned with the guide string. Leave the concrete about 2" below grade. Make sure that posts are parallel to the pickets inside of the section, otherwise the installation will look very sloppy. Continue until you reach the end of the line, or have 6-8 sections assembled.
At this point, you will want to "sight-in" the fence by looking down the top of the horizontal rails on the section. It is best to have a helper at this point to make minor adjustments for you. When the sections and posts are correctly aligned, the rails will appear as one continuous line. It is a good idea once all the posts are set to backfill the holes with dirt and tamp them down to provide extra support to the work you have finished. Continue in this fashion until all the sections are installed.
Clean up the job site and wait for the concrete to set a minimum of one day before installing post caps and gates.
Installation of Gates and Post Caps:
Once the concrete has cured you will want to install any and all gates, along with the post caps. For more information on the installation process of ornamental gates, please review the Installation Manual for Ornamental Swing Gates.
To install the post caps, you will want to use a rubber mallet and "gently" tap them to secure them on the post. Make sure to drive them down straight because if you force them they are easy to break.
Congratulations on your new fence!