Installation Manual for Tubular Barrier Gates
Shop: Tubular Barrier Gates | Tubular Barrier Gate Kits
Step 1:
Check to make sure you have received the proper parts within 5 days of receiving your kit using your packing list enclosed with your shipment. You may access the material list for your size gate from its respective page.
Step 2:
Drive two wooden or steel stakes to be used to attach string line. These will be used as a guide to install your gate. You will be setting your gate posts to this string approx. 1/4" - 1/2" from this line. Stretch masonry string from one stake to the other. Make sure the masonry string is tight and free of obstructions. This string line will represent where your gate will be once installed. Adjust stakes and string line if necessary. (Fig. A)
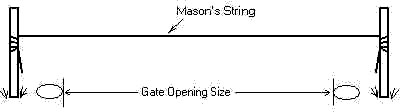
Figure A
Step 3:
You have two options when setting gate posts; (1) you may set both in concrete at the same time, or (2) you may set the hinge post first, hang the gate, and set the latch post to the gate. The latter option is the easiest and practically fool-proof, but typically only practiced with single gate kit installations. The advantage of setting both posts at once is that you can do all the post setting first and be finished with all concrete work and simply hang the gate later. However to do so, you must measure carefully the space allowance for the hinges and latch. We do not supply these measurements because we change hardware occasionally.
Additionally, when you purchase a gate kit which includes an operator, you will typically use an electric lock instead of a regular manual latch. Option (2) above is the easiest and still allows you to finish your project quickly. If you have ordered a double gate you will have to measure the hardware carefully and set both gate hinge posts at once since the gates latch to one another and not to a separate latch post. A drop rod, double gate latch, or an electric lock is supplied with these gates.
To set gate posts, dig holes 9-12" in diameter and 36"-42" deep. The depth and diameter of the concrete footers will vary depending on your location and frost depth. The hole size above works well in areas that have freezing ground. The holes should be "bell-shaped" not "carrot-shaped" (Fig. B). Next, fill hole(s) with concrete and "stick" the post into the wet concrete and plumb post with a level. Make sure your concrete consistency is not too wet or soupy. Concrete should be of a plastic-like consistency, dry enough so the post will not sink to the bottom of the hole.
The gate post should NOT extend to the bottom of the hole; there should concrete under the post as well as all around it. You will want to leave the concrete level approximately 4-5" below grade or the ground level especially in areas which freeze. Next back fill with dirt. Replumb post. When the ground freezes it can cause the concrete footer to "heave" if you fill the concrete to the top of the hole. Again, it is recommended to set the hinge post, hang gate, and then set the latch post to the gate. Leave the post(s) alone for approx. 24 hours or a sufficient amount of time for the concrete to harden.

Step 4:
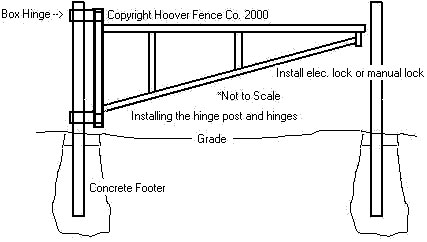
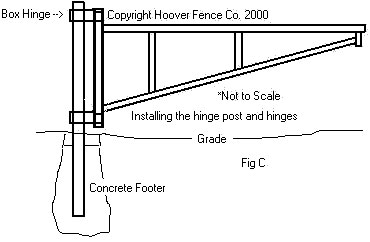
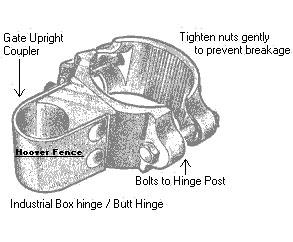
After the concrete has hardened, you may install the hinges. Box hinges, or butt hinges (Fig D) as they are often called, bolt onto the hinge post(s). Remove the two bolts and strap hinge onto post at desired height. Tighten the nuts for the bottom hinge and leave the top hinge loose. Remove the gate upright coupler(s) where the gate upright will be on the top hinge only. Gates are constructed so that the leg on the hinge side of the gate will rest on the box hinge. The top hinge should either be installed just below the top horizontal or just above. You may support the gate by installing the box hinge just below the top horizontal also. The legs and tops of the gate hinge upright may be cut off if you choose in this case. See Fig. C.
Step 5:
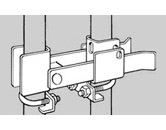
If you have concreted both the latch and hinge post at the same time, you simply need to install the latch & catch (Fig E & F) onto the latch side of the gate upright. If you have only the hinge post cemented, next you will dig the hole and cement the latch post. To do so, first install the latch and catch and then set the post to the latch in cement. See post hole notes in Step 3. Let the concrete harden before using the gate.

When finished you will have years of trouble free gate operation. If equipping gate(s) with operators, please see the installation manual included with the operator for instructions.