How to Make Chain Link Fence Bias Cut
Read More: How to Install Chain Link Fence
Shop: Chain Link Fence
Installing Chain Link Fence on A slope:
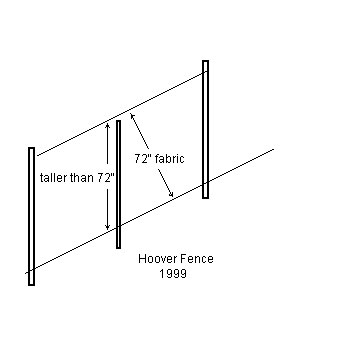
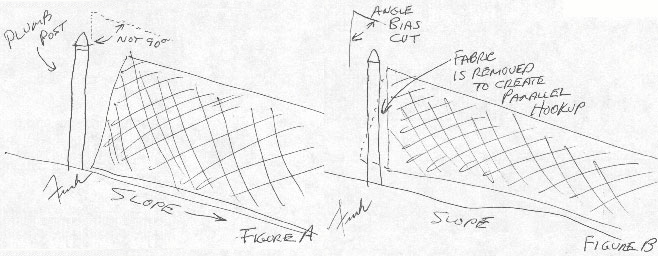
If you are terracing, or installing a chain link fence on a slope make sure that the maximum post spacing is 10'. This really holds true when on a grade. You will also want to make sure and leave the line posts taller than you typically would. Please note that when you measure posts on a slope, or grade, you measure from a right angle to the ground, not along the vertical length of the posts. If you don't do it this way then your posts will be too short, as illustrated below:
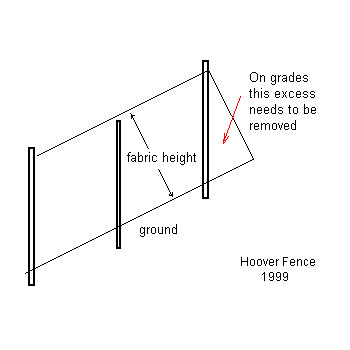
Stretching chain link on a grade requires a bias cut on one or both ends where it connects to the terminal posts (end or corner post). The problem you are having is that the chain link fabric has a square end and you are attempting to hook it up to an angle. This will leave the top or bottom loose, if you do not cut the chain link at a matching angle.
You can visualize the problem, if you temporarily tie the chain link fabric top to the top rail so it is parallel to the top rail. Then hand pull it past the terminal post. You will see the amount of chain link that goes past the terminal post. That excess must be cut off.
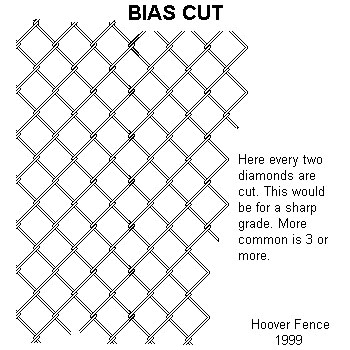
To figure how and where to cut it is done like this. Count the number of weaves that go past the post. Count the number of vertical diamonds in the fabric. Divide the vertical diamond count by the weaves that must be removed. The idea is to cut each weave evenly spaced along the entire height. It doesn't have to be exact, but fairly close.
When cutting the weaves, cut halfway in the diamond so half of the diamond remains. In other words, don't cut too close to any weave bend. Nothing needs to be done with the remaining cut-off. You can bend them over like the knuckled-ends at the top and bottom, but it is not necessary.
Making The Bias Cut:
Install the top rail. Tie the chain link loosely to the top rail in the proper position on the rail, so it follows parallel to the top rail. Pull it to the terminal post until the shortest of the two, top or bottom, just reaches the post. The other corner of the fabric will overlap the terminal (Figure B).
Count the number of weaves (not diamonds) that overlap the terminal on the long corner. Let's call this 'Cut Count'. This count is the number of cuts that must be made ultimately. Next, count the number of full diamonds on the height (Height Count).
Divide the 'Height Count' by the 'Cut Count'. Round up to nearest whole number. This number (Diamond Count) represents the number of diamonds to count before making a weave cut. Figure B illustrates an upward grade. The grade could be exactly opposite, a downward grade. The grade type will determine which end needs to be cut. In Figure B, you must start counting down from the top. Count out the 'Diamond Count' and cut the last weave in the roll. Remove the bottom portion of that weave from the fabric, cutting the other end of the weave, if necessary. At the cut, count down your 'Diamond Count' and cut the next weave. Remove the bottom portion again. Repeat until you reach the bottom of the fence.
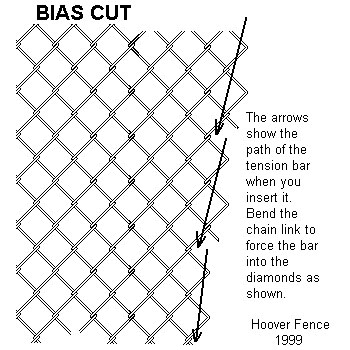
The tension bar can now be slid into the fabric following the angle created by your bias cut. It is possible that the bias is so sharp (Diamond Count of 1 or 2), that it is nearly impossible to slide the tension bar into the fabric. You may have to bend the diamond slightly where the tension bar is hitting a weave as it is slid into the fabric.

