
How to Install and Maintain Fence & Deck Post Caps
Shop: Post Caps
Installation
Standard Post Caps:
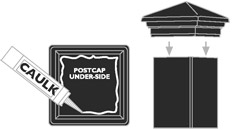
To install your decorative post caps, we recommend using an exterior-grade construction adhesive to adhere the cap to the post. Apply the adhesive liberally to the inside of the cap, and then place the cap firmly over the top of the post. Do not install solar of low voltage post caps with an adhesive, most require removing the post cap to replace batteries when needed, these caps should be mounted with removable screws.
Solar Post Caps:
Note: Not all solar lights are the built the same. All will need access for future battery replacement. Some are accessed from the bottom while others are accessed from the top. The caps that need removed should be mounted with screws while the top accessed caps can be mounted with an adhesive. See your individual instructions supplied with your caps for more information.
To activate your new solar post cap light:
- Remove the metal top or lift cap from post to access battery compartment.
- Remove the plastic tab in the battery compartment to allow for terminal connection.
- Turn the on/off switch to the OFF position to fully charge the battery. Your solar post cap light will need 24-48 hours of sunlight to fully charge.
- Replace the top if removed.
- Place your solar post cap light in direct sunlight for 24-48 hours with the switch in the OFF position to fully charge.
- Once your solar post cap is fully charged, turn the switch to the ON position.
Your solar post cap light is now ready to be installed on your post. To attach to the post, apply an exterior-grade construction adhesive to the inside edge of the molding at the bottom of the light and place it firmly onto the post. For caps with bottom access, mount the cap to the post and replace the mounting screws.
Once the batteries are fully charged, you can leave the switch in the ON position. The solar collector will charge the batteries during the daylight hours and power the light during darkness. Your solar post cap light will stay lit for an average of 6 to 8 hours during the night and turn off during the day, allowing the solar collector to re-charge the batteries.
If your solar post cap light becomes dim or does not light, simply turn the switch to the OFF position for 48 hours and allow the solar collector to fully re-charge the batteries.
Maintenance
Wood Post Caps:
As with all wood products, we recommend that you coat the wood portion of the post cap with a high-quality exterior finish to preserve the wood’s natural beauty and ensure a lifetime of enjoyment. Apply to all wood areas, including the underside of the cap, before installation.
Metal Post Caps - Copper, Stainless Steel and Brass Caps:
Our copper, stainless steel, and brass post caps come with a thin, clear coating designed to protect them before and during installation. Once they are exposed to the elements, the sun’s ultraviolet rays, moisture, and pollution begin to break down this coating, exposing the metal underneath.
Copper is sensitive to air and oxidizes (tarnishes) faster in moist air. Unfortunately, no permanent protection system will keep copper from weathering. Our copper post caps have a temporary thin layer of lacquer or polyurethane to minimize discoloration during handling and installation, but the coating will eventually break down due to moisture, ultra-violet rays, pollution and other environmental conditions, and normal weatherization.
The natural weathering of copper, resulting from the acidic attack of airborne sulfur compounds, gradually changes its surface color. The final color varies and depends on location and climate. Salt, moisture, sunlight, and orientation can all affect the final color. In general, copper progresses from a natural salmon color to a series of russet browns and grays, and finally to a blue-green or gray-green patina. Caps will vary in color as they weather, but eventually those variations will even out.
Colored Post Caps:
Our Victoria post caps come in a variety of colors, including white, green, real patina, pewter, and black. These colors are a powder-coated, baked-on finish that is extremely hard and durable, requiring little or no maintenance.
Low Voltage Lights:
Before You Start
Read and understand the instructions completely. Be sure electrical current is off. If you have any doubts about how to install fixture, please contact an electrical contractor.
Installation
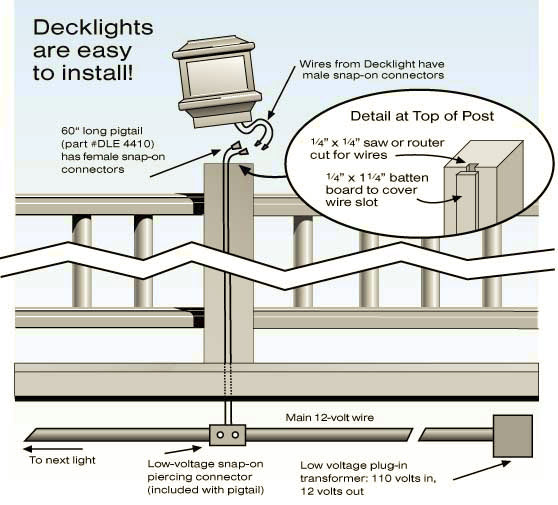
Connect deck light only to a 12 volt power source. Connect wires from "12 volt supply line" to the deck light (push connectors together, if using the DLE4410) or if using standard wire attach with wire nut. Attach deck light to post using screws provided. The deck light includes (1) 18 watt, 12 volt bulb. Turn on power to confirm light is on.
Main Low Voltage Wire
Be sure to use a minimum of 12-gauge, UV protected, exterior grade wire. To determine the amount of wire required, measure the distance from the furthest light, in series, back to where the transformer will be mounted (interior or exterior, wherever an outlet is available). Each light is wired "daisy chain" style to the main low voltage wire, using the DLE4410 pigtail. The wire is typically sold in 100’, and 500’ coils. The wire can be run above ground, under the joist or under the handrail, through the vinyl, or under ground. It is low voltage, so it need only be buried 3" or so underground. Wiring should not exceed 200’ runs. If 200+ feet is required, please refer to transformer instruction sheet for additional wiring options.
Transformer
Transformers are specified per the installation. Always size the transformer as close as possible to the required wattage draw, without going over. The wattage output of the transformer is important; you do not want too much or too little output on the transformer. To determine the size of the transformer, add up the total number of light-watts. This is the wattage of the fixture times the number of fixtures. Example: 6 each DLA6040 = 6 lights x 18 watts = 108 watts. Then select the next larger size transformer, in this example 121 watt transformer. Transformers usually have built in timers to set on/off times, as well as a manual override, or have a built in photo-eye for automatic on/off applications. With a switched exterior outlet your transformer can be controlled from indoors.