Chain Link Tennis Court Installation Manual
Locating Corner Posts and Squaring the Fence Line:
Start by measuring the width and length of two adjoining sides to the tennis court perimeter fence. The exact width and length will depend on which kit you have purchased. Make an exact mark where the first corner post is to be located; tentatively mark the other three corners.
The next step is to stretch masonry guide string along these two sides and to square this corner. There is more than one way to square corners. The easiest and perhaps most effective is to use the three-four-five method. This method may actually be used to square any corner.
Repeat the following procedure for other three corners.
Three-Four-Five Traingulation Method to Squaring Corners: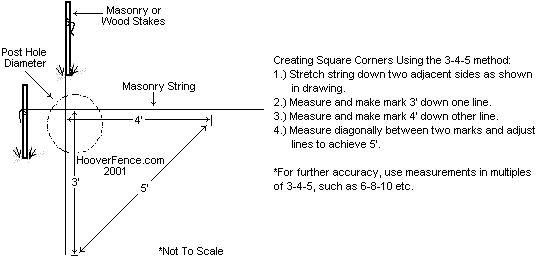
Marking Hole Locations - Gate Posts and Line Posts:
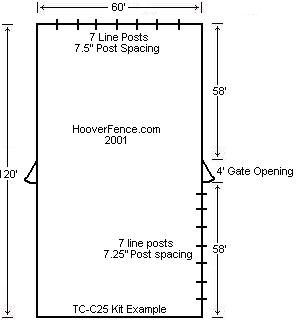
After checking that all corners are square, the next step is to use upside down paint to mark the location of intermediate posts and gate posts between the corner posts. All of our tennis courts are designed with a maximum post spacing of 8'; this provides extra stength for windscreen/ shade fabric should it be used. 6' post spacing and/or larger diameter posts may be necessary in high wind areas - consult your sales representative prior to ordering if you feel you may need this. This will affect the quantity of fence posts and fittings needed.
Locate and mark gate post locations first. Kits are designed for gates to be centered on the length of the court fence. You may be able to change the location of these gates. Make a quick sketch to see if you have enough material or check with your sales representative for details. We accept no responsibility for material shortages if you change the standard layout.
Note About Gate Sizes: As with most of our gates, gates are sold for the opening size, henceforth the 4' wide gates included with these kits will fit a 4' opening, the size in between the posts. Once you receive your material, be sure to check measurements carefully to verify gate opening sizes. This is done simply by measuring the hinges and latch provided. Gate posts are 3" O.D. (outside diameter) like the corner posts provided in our tennis court kits.
Line Post Spacing: Line posts, or intermediate posts are to be spaced evenly between all terminal posts, i.e. end posts and corners posts. See below example.
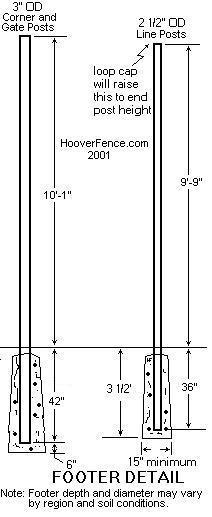
Note For Marking Holes/ Setting Posts: Once string is strung taut, consider the diameter of post to be set when making marks for digging. Terminal posts are all 3" O.D. while line posts are all 2-1/2" O.D. The 3" O.D. posts are to be set as tight to string as possible without touching the string. Set 2-1/2" posts approx. 1/4 - 3/8" from string line. The additional offset will be accounted for by the tension bands.
Setting Posts:
Next lay out posts near the holes. On a job of this size we recommend ordering a ready mix truck to deliver wet mixed concrete. If the terrain allows, trucks can drive the perimeter and 'shoot' concrete into the holes. 'Sticking' posts is a common practice for such installations. This simply means the concrete is poured into empty holes. Posts are then pushed into the concrete to height. Concrete should be of a plastic-like consistency, just wet enough to push posts into and dry enough to hold them to height. Set terminal posts tight to string and line posts 1/4" - 3/8" from string.
Mark post grade minimums as illustrated. Always measure from the top of the post to the bottom when making grade marks. Terminals (corner, end, and gate posts) are to be marked at 10'-1" (1" taller than the fence height) and 9'-9" for line posts (3" shorter than the fence height). If in doubt about the height of any posts, always err on the high side. The post(s) can always be shortened later after the concrete has set up. Setting them too low can be a major problem. Tennis court posts should be set level, or at least straight. Now is also a good time to mark sight marks for leveling posts to one another. Make marks at a comfortable eyesight level, say 5' up from grade. You may level up posts using these marks and a simple torpedo level, or use a transit.
After all posts are set, allow 48 hours curing time for concrete.
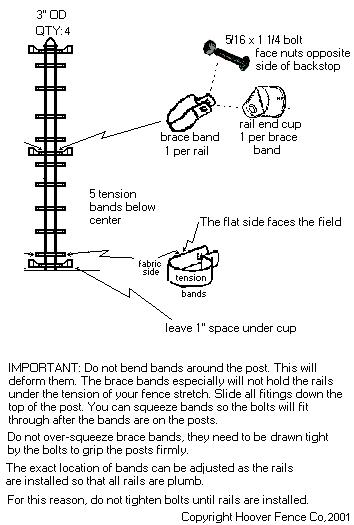
Installing Fittings on Corner Posts:
After allowing concrete to cure, the next step is to install the fence fittings. Fittings make connecting the horizontal braces and fence fabric to the posts possible. Corner posts have two hook-ups per posts, meaning the fabric will connect to the posts twice. See below sketch.
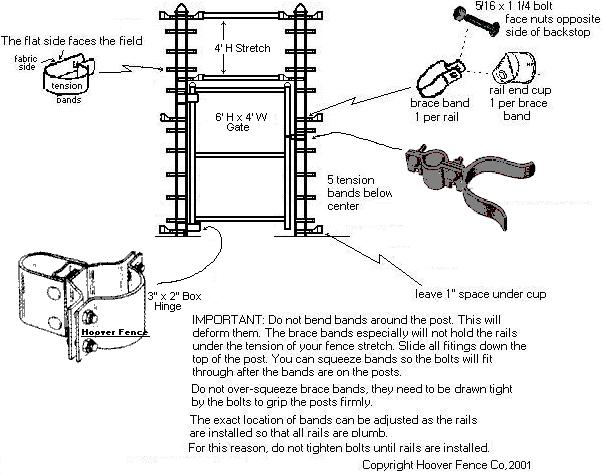
Installing Fittings on Gate Posts:
Gate posts each have one full hook-up and a 3' high hook-up for above the gate. Gates are 7' high x 4' wide; there is a short stretch of fence, roughly 3' x 4' above the gate which also needs framed. 3' high fence and tension bars are not included in the kit since you can cut down the 10' fence and extra tension bar(s) to a 3' height. Click below image for details.
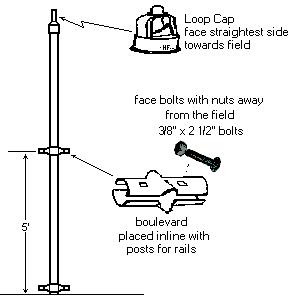
Install Fittings on Line Posts:
Line posts, or intermediate posts only have a few fittings. Install loop cap on top of post and one or two sets of boulevards or line rail clamps lower depending on how many horizontal rails you have.
Install Framework:
Top rail is installed end to end with top rail sleeves. Simply slide in plain end through loop caps and into end rail clamps. Lay out pipe, measure and cut in pieces between line posts for mid and bottom rails.

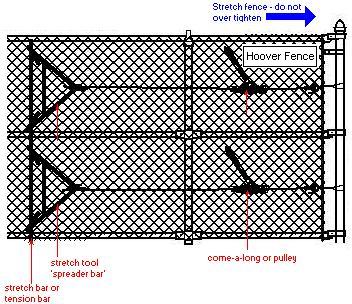
Install Fabric:
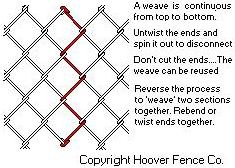
You will need two come-a-longs, two stretcher bars, and a couple ladders to stretch the chain link fabric. Start by hooking up one end to one of the corner posts. Roll our fabric in its upright position. Typically one person can lift and 'spin' roll while another steadies the top and places temporary ties on the top of the fabric to prevent it from falling over. Remember the fabric is on the inside of the tennis court with all bolts facing out. Chain link fence fabric is usually delivered in 25-50' rolls. Weaving it together is also done with the fabric upright and leaning against the framework of the tennis court. It may also be done lying flat on the ground.
Install Ties and Gates:
The last step is to tie off all rails and posts and hang the gates. Take care to center the top diamond of the fence on the top rail. Tie rails first and posts last. Use nine tie wires per line posts and five tie wires per horizontal rail in between line posts. Click HERE for an animation of how to tie a tie wire.
Gate hardware is included with the purchase of our tennis court kits. Hinges and latches are fairly self-explanatory. Both simply bolt into place. Secure bottom box hinge first. Make a mark for the second box hinge and bolt in place. Slide gate leg into box bottom box hinge and lift into the top one. Fit with hinge coupler and your gate is hung. If using a standard fork latch, bolt at a convenient height.


