1-800-355-2335 |
Mon-Fri: 7:30am - 4pm EST |
Contact Us
FAQ
CAUTION: Always wear goggles when working with wire of any kind. The "whipping" action of a loose strand could take out your favorite eye. Pick up nails when working with wood fence. You will avoid stepping on it later and the lawn mower won't throw it into your neighbor's pet. Keep fingers out of pinch points when working around gates and you'll always be able to count to ten.
For simplicity we have broken down our FAQ sheet into several main categories.
Gates
How do I install a new gate into an existing chain link fence?
There are several ways to accomplish this, depending on your particular application. Read the information below for valuable tips.
Three possible scenarios
Remove the tie wires from the top rail and line post(s) and hog rings from the bottom wire, if one exists, that are located between the two terminals to make way for the new gate. Do not unhook other stretches in other directions that may be connected to these posts. Remove the nuts from the bolts on the tension bands that hold the chain link stretched to each of the posts. Remove the bolts. The chain link will lose its tightness as one side is unfastened. Sometimes the bolts must be struck to remove them, resulting in bending of the bands. if you don't need to reuse them, it is of little concern. CAUTION: Some chain link is stretched very tight and will 'spring' back resulting in pinched fingers. The bolts can 'fly' from the bands like a bullet, wear goggles and watch out for bystanders on the other side of the fence. Remove the chain link (it can be used on the gate, if you are making one).
Remove the top rail by removing the bolt from the brace band and rail end cup at one end. Remove the other bolt and rail end cup. (This rail can be used to make the new gate).
Remove all the bands that are no longer needed. You should now have an open space, ready for installation of your new gate. If one is to be ordered to fit, measure the gate opening. That is the distance 'between' the posts or 'inside' to 'inside' measurements of your terminals. The gate should be made to fit that opening size including the space used by hinges and latch.
First disconnect the bolts and bands from the chain link that is stretched to the terminal post where you want the new gate to be placed. CAUTION: Chain link can be stretched extremely tight and will 'spring' when disconnected. Pinched fingers and 'flying' bolts can result. Knock bolts out with a hammer and watch the eyes of bystanders on the other side of the fence as well as your own eyes.
Once the chain link is disconnected, 'peel' it back far enough to miss the place where your other gate post belongs. You can loosen or disconnect the tie wires that hold the chain link to the top rail, if they are too tight to slide.
Measure from the inside of the terminal post (gate side) along the top rail to the approximate location of the next gate post. If the gate is for a 48" wide opening (which includes the space taken up by the hinges and latch), measure 48". Cut the top rail with a pipe cutter, hacksaw or flame thrower! It is important not to cut too far away from the existing gate post, because the remainder of the top rail will have to be cut again to fit exactly after the new post is installed. You could leave this rail uncut, if you can force it out of your way so you can dig the new gate post hole, without 'banging' your fingers against the rail as you drive a post hole digger down into the ground. If you choose not to cut the rail at this time, disconnect the bolt and rail end cup at the existing terminal so you can push the rail out of your way.
Measure the inside measurement for the new gate, keeping in mind allowing for the space that will be used up by your new hinges and latch. The amount of space can be determined by placing the hardware on the gate measuring from hinge to latch. Usually this space is 3 3/4" for most residential hardware, but it is best to measure the 'gap' yourself. Not all hardware is identical. A 48" opening gate will actually measure about 44 1/4". Allow an extra 1/4" for fork type latches, so they have enough room to swing up without binding on the gate.
Measure along the ground to establish the 'inside' of the new gate post and mark the ground. Add 1/2 the diameter of the post to that to find the center of the new gate post hole. Eyeball down the fence line to find the center of the other dimension or use a string. Dig the hole to a depth of 36" (or 30" if you get tired). The diameter of the new hole for residential chain link need only be about 6" to 8". 'Bell' the hole larger on the bottom. (The bottom diameter should be larger than the top diameter). Place the new post in the hole and pour concrete to within several inches of the top of the ground, but not all the way. that little bit on top does no good and may cause posts to heave in freezing temperatures. Make sure you maintain the proper gate opening size throughout the pouring of the concrete, because posts often times will shift out of position. The post should be the height of the fence plus 1 or 2" higher out of the ground. If possible, make it level to the existing gate post on top by laying a 2 x 4 or long level across the top of the posts.
Another way of guaranteeing that the gate will fit, is to install the hinges and gate on the existing gate post. This way you can see exactly where the new gate post must go.
After the concrete sets up in a day or two (three is safe). Place the brace band, rail end cup and bolt for the top rail on the new post. Now you can recut the top rail to fit exactly into the back of the cup...NOT THE FRONT OF THE CUP! Make sure the top rail is centered on the post and the rail end cup is tight. Make sure the top rail is level or at least runs smoothly into the new post.
Restretch your chain link to the new gate post. Hang your gate and get a brewski!
Choose the location of the proposed gate and mark the center of the holes for the posts with paint or popsickle sticks. The width can be determined by adding the width of one gate post to the gate opening size. Read the above section for 'gate opening' information. That measurement will be the center to center measurement of the new gate post holes.
Cut the chain link in the center of those marks with bolt cutters or pliers (or a chop saw). CAUTION: Chain link can be very tightly stretched causing the pieces of cut wire to 'fly' like shrapnel. Wear goggles and watch out for small children, who are usually right down there at eye level to disaster.
Peel the chain link back from the cut, loosening tie wires as needed. Cut the top rail at the center of the gate and push it over. Tie it out of the way or prop something against it. After you install the posts, you will need to cut the remainder to fit the new gate posts.
Dig both holes like there will be no tomorrow to a depth of 30-36" and 6-8" diameter. 'Bell' the bottom diameter of the holes to a larger diameter than the top diameter. Concrete the first post in the center of the fence line so it lines up with the other existing posts. Use a string, if you can't eyeball straight. If you are tired, wait a couple of days, hang the gate on this post first to determine the exact location of the next gate post. Concrete the second new gate post to fit.
Restretch the chain link to the new posts. Do not overstretch. the chain link does not have to be so tight that you can play "dueling banjos". Retie the top rail and go play with your computer!
MORE INFORMATION:
Three possible scenarios
- The gate can be made to fit between two existing terminal posts.
- The gate can be added next to an existing end or corner post.
- The gate must be added in the middle of a stretch where an existing end* or corner* post is not available.
The gate can be made to fit between two existing terminal posts.
This is the simplest installation. Unless you are extremely lucky and the posts are spaced exactly for a standard gate, a custom sized gate must be made to fit.Remove the tie wires from the top rail and line post(s) and hog rings from the bottom wire, if one exists, that are located between the two terminals to make way for the new gate. Do not unhook other stretches in other directions that may be connected to these posts. Remove the nuts from the bolts on the tension bands that hold the chain link stretched to each of the posts. Remove the bolts. The chain link will lose its tightness as one side is unfastened. Sometimes the bolts must be struck to remove them, resulting in bending of the bands. if you don't need to reuse them, it is of little concern. CAUTION: Some chain link is stretched very tight and will 'spring' back resulting in pinched fingers. The bolts can 'fly' from the bands like a bullet, wear goggles and watch out for bystanders on the other side of the fence. Remove the chain link (it can be used on the gate, if you are making one).
Remove the top rail by removing the bolt from the brace band and rail end cup at one end. Remove the other bolt and rail end cup. (This rail can be used to make the new gate).
Remove all the bands that are no longer needed. You should now have an open space, ready for installation of your new gate. If one is to be ordered to fit, measure the gate opening. That is the distance 'between' the posts or 'inside' to 'inside' measurements of your terminals. The gate should be made to fit that opening size including the space used by hinges and latch.
The gate can be added next to an existing end or corner post.
This is fairly simple to do, because only one terminal post needs to be added. A standard sized gate can usually be used because the new post can be placed to make the gate fit.First disconnect the bolts and bands from the chain link that is stretched to the terminal post where you want the new gate to be placed. CAUTION: Chain link can be stretched extremely tight and will 'spring' when disconnected. Pinched fingers and 'flying' bolts can result. Knock bolts out with a hammer and watch the eyes of bystanders on the other side of the fence as well as your own eyes.
Once the chain link is disconnected, 'peel' it back far enough to miss the place where your other gate post belongs. You can loosen or disconnect the tie wires that hold the chain link to the top rail, if they are too tight to slide.
Measure from the inside of the terminal post (gate side) along the top rail to the approximate location of the next gate post. If the gate is for a 48" wide opening (which includes the space taken up by the hinges and latch), measure 48". Cut the top rail with a pipe cutter, hacksaw or flame thrower! It is important not to cut too far away from the existing gate post, because the remainder of the top rail will have to be cut again to fit exactly after the new post is installed. You could leave this rail uncut, if you can force it out of your way so you can dig the new gate post hole, without 'banging' your fingers against the rail as you drive a post hole digger down into the ground. If you choose not to cut the rail at this time, disconnect the bolt and rail end cup at the existing terminal so you can push the rail out of your way.
Measure the inside measurement for the new gate, keeping in mind allowing for the space that will be used up by your new hinges and latch. The amount of space can be determined by placing the hardware on the gate measuring from hinge to latch. Usually this space is 3 3/4" for most residential hardware, but it is best to measure the 'gap' yourself. Not all hardware is identical. A 48" opening gate will actually measure about 44 1/4". Allow an extra 1/4" for fork type latches, so they have enough room to swing up without binding on the gate.
Measure along the ground to establish the 'inside' of the new gate post and mark the ground. Add 1/2 the diameter of the post to that to find the center of the new gate post hole. Eyeball down the fence line to find the center of the other dimension or use a string. Dig the hole to a depth of 36" (or 30" if you get tired). The diameter of the new hole for residential chain link need only be about 6" to 8". 'Bell' the hole larger on the bottom. (The bottom diameter should be larger than the top diameter). Place the new post in the hole and pour concrete to within several inches of the top of the ground, but not all the way. that little bit on top does no good and may cause posts to heave in freezing temperatures. Make sure you maintain the proper gate opening size throughout the pouring of the concrete, because posts often times will shift out of position. The post should be the height of the fence plus 1 or 2" higher out of the ground. If possible, make it level to the existing gate post on top by laying a 2 x 4 or long level across the top of the posts.
Another way of guaranteeing that the gate will fit, is to install the hinges and gate on the existing gate post. This way you can see exactly where the new gate post must go.
After the concrete sets up in a day or two (three is safe). Place the brace band, rail end cup and bolt for the top rail on the new post. Now you can recut the top rail to fit exactly into the back of the cup...NOT THE FRONT OF THE CUP! Make sure the top rail is centered on the post and the rail end cup is tight. Make sure the top rail is level or at least runs smoothly into the new post.
Restretch your chain link to the new gate post. Hang your gate and get a brewski!
The gate must be added in the middle of a stretch where an existing end or corner post is not available.
This is the hardest installation, because two new gate posts must be added and the fence must be restretched on both posts. You will also need two new tension bars, tension bands, bolts, rail end cups and brace bands to hook up the chain link to the two new posts.Choose the location of the proposed gate and mark the center of the holes for the posts with paint or popsickle sticks. The width can be determined by adding the width of one gate post to the gate opening size. Read the above section for 'gate opening' information. That measurement will be the center to center measurement of the new gate post holes.
Cut the chain link in the center of those marks with bolt cutters or pliers (or a chop saw). CAUTION: Chain link can be very tightly stretched causing the pieces of cut wire to 'fly' like shrapnel. Wear goggles and watch out for small children, who are usually right down there at eye level to disaster.
Peel the chain link back from the cut, loosening tie wires as needed. Cut the top rail at the center of the gate and push it over. Tie it out of the way or prop something against it. After you install the posts, you will need to cut the remainder to fit the new gate posts.
Dig both holes like there will be no tomorrow to a depth of 30-36" and 6-8" diameter. 'Bell' the bottom diameter of the holes to a larger diameter than the top diameter. Concrete the first post in the center of the fence line so it lines up with the other existing posts. Use a string, if you can't eyeball straight. If you are tired, wait a couple of days, hang the gate on this post first to determine the exact location of the next gate post. Concrete the second new gate post to fit.
Restretch the chain link to the new posts. Do not overstretch. the chain link does not have to be so tight that you can play "dueling banjos". Retie the top rail and go play with your computer!
MORE INFORMATION:
Are there standard sizes of wood gates and can you tell me anything about wood gates?
Please read the article below for valuable information concerning wood gates.
The choice of wood gates presents some challenges that a person has to take into consideration. Although a good wood fence can be constructed that will last for 10-20 years without much more trouble than replacing an occasional warped picket or staining, the gate itself will be the first part of the fence to fail.
100% wood gates, with wood rails and wood diagonal bracing, are prone to sagging either within the frame itself or when the bolts in the hinges "pull" through the wood. This is due to the "soft nature" of fence wood, like red cedar. Although the cedar will be resilient to decay, it is very soft and bolts tend to "pull" through the wood eventually.
We take great care in constructing wood fences for this reason. All 2 x 4 framework is ship-lapped at joints and bolted with galvanized carriage bolts, two per corner or brace. It not only provides the maximum protection against sagging, but makes an attractive gate that looks finely crafted instead of one that just consists of 3 rails and a nailed on diagonal brace. On 5' to 7' high gates, we use 3 horizontal rails. On 4' high or less, we use 2 horizontal rails. Two vertical outside frame rails are used also that provide the outside rectangular frame. Each corner is routed so the intersecting rails lie flush to each other and we install two bolts at each corner. A diagonal 1 x 4 or some suitable other cedar matching piece is used as a diagonal brace to help delay sagging. This brace is also routed into the 2 x 4 frame to provide a clean, strong connection. It is also bolted with two bolts per connection. On a 3 rail gate, the diagonal gets routed and bolted to the center rail also.
In twenty years of making wood gates, this has been our most successful construction. The only other precaution is to use long bolts to secure the hinges to the posts or fence. Most hinge sets do not provide bolts long enough. The gate side bolts should pass through the picket and rails on the gate and be nutted. Lag bolts, which are usually provided with most hinge sets, will eventually pull out of the soft cedar or other wood that is used. Even in harder treated pine fences, the failure of bolts will occur eventually.
The cheaper steel frames consist of galvanized fence pipe notched at each weld for a neat, professional looking appearance. The pipe used is typically 2" OD. Wall thickness varies with gate use, style and size. This pipe frame is all galvanized and usually not painted to match the wood. Not as attractive as the more expensive version, but very strong and functional without spending a lot. The welds will burn off the factory galvanized finish, so a special galvanizing paint is applied after the welding to protect against rusting. The painted welds must be touched up in 3-5 years as the paint is not as good as the original galvanizing.
A nicer looking steel frame is one constructed of 2 x 3 or 2 x 4 steel stock to nearly match the appearance of the wooden rails on the rest of the fence. The steel is usually painted brown to keep with the appearance of the wood. it can be painted any color when ordered. These framed gates will cost a little more than the tubular type.
The welded steel framed gates are a better choice. The steel frame is strong enough to take the abuse of the operator. Most swing gates require a center brace regardless of the height. This provides a place for the operator arm to attach. It is wise to choose the operator with the gate. You can assure that proper bracing is installed in the gate ahead of time to accommodate the operator.
Wind is a major factor in wood gate and operator design. Heavier operators should be considered to handle the additional load on windy days. If the gate is hidden between buildings and foliage the problem is not as bad as a gate that is in a wide open space and has a constant wind. Consult with Hoover Fence gate operator experts to match gates to gate operators.
On widths of 6' or more, use a double swing gate. Gates of 16' opening size are the widest possible with wood frames. These gates should have a leading edge roller to help support the gate on each leaf.
Larger wood picket gates can be constructed, but steel frames are the only way to assure satisfactory results.
Here is some information to help you decide on width. Your front house door is no bigger than 36" so a minimum of 36" wide gates should be used. Your appliance will not fit through the gate that you want in the house.
A driveway should have 12' minimum clearance through the gate. 14' is better. That provides a single lane. Most highways are only 10' wide and people drive them at 65 miles per hour. A double lane driveway should then be at least 22' wide. 24' is better. Please don't drive that at 65 miles per hour though.
If your gate is near the road and trucks and trailers must get in, consider the turning radius. A 40' trailer requires a wide radius. You can generally see tire tracks off the driveway on existing drives. You better measure from the tire tracks and not the driveway. Someone will hit the gate post.
Consider setting the gate further from the road. A front fence could be right up to the road right of way, but angle the fence back on the sides of the driveway so you can allow for the gate to have a 15-20' set back. This not only provides a wider turning radius but allows a car to pull into the drive without having to stop in the road to open the gate. Don't make the gates any wider than necessary. It will only present problems.
Keep in mind that on a windy day, the gate will create a sail that a small child can not open or close. Consider spaces between the pickets to allow for the wind to pass through. never let two children "play" with the gate. One will hurt the other when it is slammed on the unsuspecting victim.
SUBJECT: WOOD GATES
This article was reproduced in World Fence News, May 1998.The choice of wood gates presents some challenges that a person has to take into consideration. Although a good wood fence can be constructed that will last for 10-20 years without much more trouble than replacing an occasional warped picket or staining, the gate itself will be the first part of the fence to fail.
100% wood gates, with wood rails and wood diagonal bracing, are prone to sagging either within the frame itself or when the bolts in the hinges "pull" through the wood. This is due to the "soft nature" of fence wood, like red cedar. Although the cedar will be resilient to decay, it is very soft and bolts tend to "pull" through the wood eventually.
We take great care in constructing wood fences for this reason. All 2 x 4 framework is ship-lapped at joints and bolted with galvanized carriage bolts, two per corner or brace. It not only provides the maximum protection against sagging, but makes an attractive gate that looks finely crafted instead of one that just consists of 3 rails and a nailed on diagonal brace. On 5' to 7' high gates, we use 3 horizontal rails. On 4' high or less, we use 2 horizontal rails. Two vertical outside frame rails are used also that provide the outside rectangular frame. Each corner is routed so the intersecting rails lie flush to each other and we install two bolts at each corner. A diagonal 1 x 4 or some suitable other cedar matching piece is used as a diagonal brace to help delay sagging. This brace is also routed into the 2 x 4 frame to provide a clean, strong connection. It is also bolted with two bolts per connection. On a 3 rail gate, the diagonal gets routed and bolted to the center rail also.
In twenty years of making wood gates, this has been our most successful construction. The only other precaution is to use long bolts to secure the hinges to the posts or fence. Most hinge sets do not provide bolts long enough. The gate side bolts should pass through the picket and rails on the gate and be nutted. Lag bolts, which are usually provided with most hinge sets, will eventually pull out of the soft cedar or other wood that is used. Even in harder treated pine fences, the failure of bolts will occur eventually.
SUBJECT: WOOD GATES WITH STEEL FRAMES
The best gates use welded steel frames that have wood pickets attached to the frame. These gates will not sag like all wood framed gates. The frame resembles the wood counter part, but the diagonal is not needed with narrow gates. Since every style of fence is different the size, and layout of steel frames and bracing can vary a lot. The wider and taller the gate, the more diagonal bracing is required.The cheaper steel frames consist of galvanized fence pipe notched at each weld for a neat, professional looking appearance. The pipe used is typically 2" OD. Wall thickness varies with gate use, style and size. This pipe frame is all galvanized and usually not painted to match the wood. Not as attractive as the more expensive version, but very strong and functional without spending a lot. The welds will burn off the factory galvanized finish, so a special galvanizing paint is applied after the welding to protect against rusting. The painted welds must be touched up in 3-5 years as the paint is not as good as the original galvanizing.
A nicer looking steel frame is one constructed of 2 x 3 or 2 x 4 steel stock to nearly match the appearance of the wooden rails on the rest of the fence. The steel is usually painted brown to keep with the appearance of the wood. it can be painted any color when ordered. These framed gates will cost a little more than the tubular type.
SUBJECT: AUTOMATION OF WOOD GATES
If you intend to install an automatic gate opener, you must take care in how the gate is constructed and carefully choosing the proper gate operator. All wood framed gates with automatic gate operators are not a good idea. The additional strain on the wood frame will cause more problems than normally associated with wood frames.The welded steel framed gates are a better choice. The steel frame is strong enough to take the abuse of the operator. Most swing gates require a center brace regardless of the height. This provides a place for the operator arm to attach. It is wise to choose the operator with the gate. You can assure that proper bracing is installed in the gate ahead of time to accommodate the operator.
Wind is a major factor in wood gate and operator design. Heavier operators should be considered to handle the additional load on windy days. If the gate is hidden between buildings and foliage the problem is not as bad as a gate that is in a wide open space and has a constant wind. Consult with Hoover Fence gate operator experts to match gates to gate operators.
SUBJECT: WIDTHS OF WOOD GATES
Wood gates can be in any size within maximum limitations. Never make a wood gate wider than necessary. If a 3' wide walk gate is enough, forget the 1' waste on the rails and make it 3' (2 x 4's are usually 8' long). Every foot adds weight that will eventually make the gate more prone to sagging.On widths of 6' or more, use a double swing gate. Gates of 16' opening size are the widest possible with wood frames. These gates should have a leading edge roller to help support the gate on each leaf.
Larger wood picket gates can be constructed, but steel frames are the only way to assure satisfactory results.
Here is some information to help you decide on width. Your front house door is no bigger than 36" so a minimum of 36" wide gates should be used. Your appliance will not fit through the gate that you want in the house.
A driveway should have 12' minimum clearance through the gate. 14' is better. That provides a single lane. Most highways are only 10' wide and people drive them at 65 miles per hour. A double lane driveway should then be at least 22' wide. 24' is better. Please don't drive that at 65 miles per hour though.
If your gate is near the road and trucks and trailers must get in, consider the turning radius. A 40' trailer requires a wide radius. You can generally see tire tracks off the driveway on existing drives. You better measure from the tire tracks and not the driveway. Someone will hit the gate post.
Consider setting the gate further from the road. A front fence could be right up to the road right of way, but angle the fence back on the sides of the driveway so you can allow for the gate to have a 15-20' set back. This not only provides a wider turning radius but allows a car to pull into the drive without having to stop in the road to open the gate. Don't make the gates any wider than necessary. It will only present problems.
SUBJECT: WOOD GATE SAFETY
Consider the weight of wood gates. They can get quite heavy. If small children have access to the gate and the latch and hinge side allow for pinch points, a child could get seriously hurt on a slamming gate. Put inside jams on the gate so little fingers will not get in the hinge side cracks when the gate is open. Leave ample space on the latch side so as not to allow little fingers to get caught in the small pinch points.Keep in mind that on a windy day, the gate will create a sail that a small child can not open or close. Consider spaces between the pickets to allow for the wind to pass through. never let two children "play" with the gate. One will hurt the other when it is slammed on the unsuspecting victim.
Are there any safety factors that must be considered when designing wood gates?
SUBJECT: WOOD GATE SAFETY
Consider the weight of wood gates. They can get quite heavy. If small children have access to the gate and the latch and hinge side allow for pinch points, a child could get seriously hurt on a slamming gate. Put inside jams on the gate so little fingers will not get in the hinge side cracks when the gate is open. Leave ample space on the latch side so as not to allow little fingers to get caught in the small pinch points.Keep in mind that on a windy day, the gate will create a sail that a small child can not open or close. Consider spaces between the pickets to allow for the wind to pass through. never let two children "play" with the gate. One will hurt the other when it is slammed on the unsuspecting victim.
How do I fix a sagging gate?
Question:
My son has a sagging gate across his entry way and I would like to have information in pulling the sag out of the gate. The gate is approximately 10-12 feet wide and about four feet high and drags on the swinging side. I have suggested using a six-strand wire connected in the center with a turnbuckle. the wire secured on the end that drags and diagonally to the top of the gate. When he turns the turnbuckle the wire(s) will lift the dragging in as he shortens the diagonal wire(s). Will this answer his problem?????
Salisbury , NC
 You hit the problem right squarely on the head. It's called a diagonal truss.
(fig 1) Most hi-tensile light gauge wire will work. Hi-tensile simply means it can stretch a long way before it snaps. A lot of hardware stores sell what is commonly called a "non-sag gate kit" or something similar. We sell them also. Those typically use a wound, stranded cable instead of a wire. This type is used for wood gates normally. The hardware that comes with the kit is set up for wood. Replace the lag bolts with self tap screws or weld the steel plate fastener onto a steel gate.
You hit the problem right squarely on the head. It's called a diagonal truss.
(fig 1) Most hi-tensile light gauge wire will work. Hi-tensile simply means it can stretch a long way before it snaps. A lot of hardware stores sell what is commonly called a "non-sag gate kit" or something similar. We sell them also. Those typically use a wound, stranded cable instead of a wire. This type is used for wood gates normally. The hardware that comes with the kit is set up for wood. Replace the lag bolts with self tap screws or weld the steel plate fastener onto a steel gate.
 On heavy or large gates, we use a 3/8" diameter galvanized steel rod, threaded about 6-12" on the end. The plain end is welded or bent to loop though the top hinge side of the gate and the other end is passed through a hole in a turnbuckle that is nothing more than a "L" shaped steel piece fastened to the low sagging corner. A nut is placed on the threaded rod. As it is tightened, the gate rises.
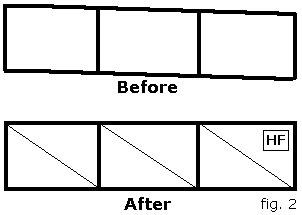
(fig 2) On very large gates (over 18'), several trusses are placed, if needed. The first starts at the top, hinge side and secures at the bottom of the first vertical brace. The second fastens at the top of that vertical brace and goes to the bottom of the next vertical brace. And so it goes until each section of the gate has it's own truss. Each truss can be tightened individually so the gate does not have a chance to sag in the center. Only one truss would lift the end, but the center could sag.
On heavy or large gates, we use a 3/8" diameter galvanized steel rod, threaded about 6-12" on the end. The plain end is welded or bent to loop though the top hinge side of the gate and the other end is passed through a hole in a turnbuckle that is nothing more than a "L" shaped steel piece fastened to the low sagging corner. A nut is placed on the threaded rod. As it is tightened, the gate rises.
(fig 2) On very large gates (over 18'), several trusses are placed, if needed. The first starts at the top, hinge side and secures at the bottom of the first vertical brace. The second fastens at the top of that vertical brace and goes to the bottom of the next vertical brace. And so it goes until each section of the gate has it's own truss. Each truss can be tightened individually so the gate does not have a chance to sag in the center. Only one truss would lift the end, but the center could sag.
MORE INFORMATION:
You hit the problem right squarely on the head. It's called a diagonal truss.
(fig 1) Most hi-tensile light gauge wire will work. Hi-tensile simply means it can stretch a long way before it snaps. A lot of hardware stores sell what is commonly called a "non-sag gate kit" or something similar. We sell them also. Those typically use a wound, stranded cable instead of a wire. This type is used for wood gates normally. The hardware that comes with the kit is set up for wood. Replace the lag bolts with self tap screws or weld the steel plate fastener onto a steel gate.
On heavy or large gates, we use a 3/8" diameter galvanized steel rod, threaded about 6-12" on the end. The plain end is welded or bent to loop though the top hinge side of the gate and the other end is passed through a hole in a turnbuckle that is nothing more than a "L" shaped steel piece fastened to the low sagging corner. A nut is placed on the threaded rod. As it is tightened, the gate rises.
(fig 2) On very large gates (over 18'), several trusses are placed, if needed. The first starts at the top, hinge side and secures at the bottom of the first vertical brace. The second fastens at the top of that vertical brace and goes to the bottom of the next vertical brace. And so it goes until each section of the gate has it's own truss. Each truss can be tightened individually so the gate does not have a chance to sag in the center. Only one truss would lift the end, but the center could sag.
MORE INFORMATION:
Is there a standard for how to specify gate widths? In other words, is a 48" wide gate a 48" actual width or a 48" opening between posts?
Good question. Typically a 48" wide gate should refer to the opening size. That is the distance between the posts. Be careful though, the actual gate width is determined by the type of hinges and latch to be used with the gate.
There is no standard there. It is best to specify the gate actual width measurement, the type of hinges and latch to be used and the gate opening width. If we provide the gate, hinges and latch, all we need need to know is the gate opening size, size of posts and height of the gate. Naturally the type of gate also. These factors can vary significantly among the different types of gates. Always determine which latch and hinges are to be used in advance.
Chain link single swing gates are typically 3 1/2"-3 3/4" smaller than the gate opening size, if standard drop fork latch and male and female strap hinges are used.
Wood fence gates can be only 1" smaller than the opening size. The hinges generally take up little to no space and the latch only 1/2-1".
Vinyl gates vary significantly. The size we most commonly use is 50". That is the actual gate width. Add 1 1/2", or a total of 51 1/2" for the gate opening size. Again, it depends entirely on the hardware to be used. Our standard self-closing hardware only uses 1 1/2".
Ornamental gates can vary also. The sizes in our catalogs are opening sizes. the gates measure less to make up for the hardware. Some types of hardware only use as little as 1" as in wood gates.
The first time installer would be wise to set the hinge side post of the gate first. Hang the gate and hardware and then install the latch-side post last. You will be guaranteed of a perfect fit every time.
How do I install an automated wood gate that will not sag?
Question:
How do I install an automated wood gate that will not sag? I am installing a double swing automatic gate and need to build a 16' total opening (8' double swing leafs) gate. I want to build a wood gate to match my exisiting fence. I read that the metal frame or aluminum frame is necessary to do this to prevent sagging and add to its durability. Can I purchase the double swing gate kit (DAG-60, i think) for this application or is there a better suggestion? I am trying to keep my costs as low as possible. Additional Info: When closed, the gate will be 5" off the ground to allow for clearance of the slope I have in my driveway. I do not believe I can effectively attach a wheel to the frames. I want the frame to securely lock when it is closed (the auto gate operator has an attachement lock which can be applie to gate)--or if you have any suggestions? Thanks!
Applicable Products:
Wood Gates.
Reply: Thank you for your interest in our wood gate kits and automation equipment. As you noted, we highly recommend steel or aluminum frames for all automated and larger wood gates. The adjustable gate kits may be used for larger wood gates and automated gates, however we strongly recommend adding a brace or swapping the truss cable included in the kit with a different one. These kits are an excellent product at an excellent price. The only short coming to them is the truss cable and turnbuckle. I personally dislike the turnbuckle, however for only a few dollars one can replace it with one of higher quality. We suggest adding a brace for two reasons. One, automated gates must withstand higher stress than most manually opened gates. Two, although not imperative it is preferred to mount the gate operator centered on the vertical portion of the gate; the gate kit does not include a mid rail. You may use steel or wood as a mid rail with bolt-on construction. If attaching the operator to wood gate or a wood post, be sure to do so with through-bolt construction, not lag screws. Also use larger metal washers to help prevent the bolts from 'pulling' through the wood. If a gate is built properly, no matter what size, there is no need for a wheel. This is a common misunderstanding for both do-it-yourselfers and contractors. We do sell swing gate wheels for both tubular gates and wood gates, however they are primarily used to repair older gates and are much less expensive than a new gate. You may add a wheel to the adjustable gate kits mentioned above, however it is unnecessary. If you are automating the gate, do not use a wheel on the leading edge of the gate. This will increase stress/ friction on the operator and gate and cause them both to wear out prematurely.
Updated 06/02/06
What can you recommend for a safety device for my automated gate?
Question:
What can you recommend for a safety device for my automated gate? What should I consider in determining whether or not a loop detector is needed? One site is a single family residence with a one lane drive. Another is a 10 house subdivision with a 2 lane drive. Both sites have the gates swinging out, as the drives go uphill into the premises. Will a photoeye keep the gate from opening into a car if it is too close as the driver activates his remote? Naturally, we'd just as soon avoid cutting and patching the pavement, but don't want to compromise safety.
Applicable Products:
Automated Gates.
Reply: Thank you for your interest in our gate operator accessories. There are many different safety devices on the market. Loops and detectors, photoeyes, and safety edges are some of the more popular devices. Each have their advantages and disadvantages.
Non-Contact Devices: i.e. photoeyes and loops. Photoeyes are perhaps the most popular since they are inexpensive to purchase and install. Photoeyes work excellent on sliding gates as the beam may be aimed in a straight line parallel with the gate and protect most of the danger areas. Photoeyes also will prevent the gate from opening or closing on any obstruction, pedestrians and vehicles. Photoeyes are also easy to install for the first time do-it-yourself customer. Due to design, multiple photoeyes are often used to protect a swinging gate. You can see our complete line of photoeyes here: Photoeyes
Loops and loop detectors: Loop detectors are comparable in price, however are more difficult to install. They will protect larger metal objects only since they magnetically sense obstructions. They are effective for both swing and slide gates. Often three loops are installed. One in front, one behind, and one underneath the gate. All three need a detector. Often the inner loop serves a dual function, free exit and safety. The one in front and underneath 'shadow loop' the gate typically serve as a safety device only. You can see our complete line of photoeyes here: Vehicle Loop Detectors
Contact Devices: i.e. safety edges. As with photoeyes, multiple edges are often required to safeguard gates and doors. They are effective for both swing and slide gates. All operators (after March 2000) have an inherent safety device, the automatic reversing mechanism. This mechanism will cause gates and doors to automatically reverse should it close/ open on an obstruction. The sensitivity may be adjusted to account for different types of gates and weather conditions. Safety edges increase the sensitivity of the automatic reversing mechanism. Safety edges are a pad-like devices often installed on the leading edge of gates or horizontally to protect against scratched and dented vehicles. They are very easy to install for all customers. They are also an effective protection device for pedestrians. You can find safety edges here: Safety Edges
To conclude, all automated gates and doors should have safety devices installed for protection against property damage and injury. Automated gates should not be used by pedestrians. A separate pedestrian gate should be installed away from the automated gate and equipment. Some operators are powerful enough to kill a person if trapped. Photoeyes, loops, and edges are all inexpensive when compared to costly repair bills. The correct safety device will depend on many factors, i.e. type and size of gate, type and quantity of users, and type of operator. Chances are multiple safety devices should be installed. Hopefully the above information will aid in differentiating between the various devices on the market. Please note we feature all our products online complete with current pricing, specifications, and helpful how-to information. We add products daily so check back frequently for updates.
Updated 06/02/06
Do you sell openers for automating a gate?
Applicable Products:
Automated Gates.
Reply: Yes we do. We carry openers made by two different manufacturers. GTO is a manufacturer that makes gate operators for both swing and slide gates. The GTO operators are 12 volt DC gate openers and are easy to install for the beginner with no electrical experience. We also sell Linear/OSCO operators that are 115 - 230 AC gate openers. They are used for high-end residential and commercial applications. They are also available for swing or slide gates. Gate operators come in several styles for different applications (width, weight, etc.) See our Gate Operator page to guide you through the process of choosing an operator or just call our 800 number for recommendations. We also sell the safety devices necessary to assure a fail-proof system that will open/close your gate safely. Check out these links for more information on available electronics for both our operators.
Gate Operator Accessories I Gate Operator
Updated 06/02/06
How do I keep a gate from opening more than 90°
Question:
How do I keep a gate from opening more than 90°? I have a chain link double swinging gate between my driveway and the alley. Currently the hinge is the standard male/female residential strap hinge. This allows for 180 degree opening which presents a potential safety hazard if the gate swings open into our alley and there is oncoming traffic. I would like to replace these with 90 degree hinges to alleviate this potential hazard. Would your commerial hinges be a suitable replacement for this residential installation (your part number BH1-8). If not, do you carry a residential equivalent or could you offer an alternative? I'm very eager to get this done as quickly as possible, If you have a suitable product in stock could I arrange for overnight or some form of expedited delivery? I'll check on my post sizes this evening so we can put this order together. Thank you...
PS: your web site is an absolutely marvelous resource for us fence novices.
Applicable Products:
Gates.
Reply: Thank you for your interest in our chain link hardware. The standard male and female hinges for a chain link gate may be 'cocked' so that they will allow opening in only one direction. Swivel the male hinges in the same direction where you want the gate to swing. Install a self-tap screw through the hinge and into the frame to prevent them from twisting. Another alternative is to use malleable or pressed steel industrial butt / box hinges. However the same principle applies. You'll need to install them so that the portion which accepts the gate upright is at a right angle to the gate opening. You may also use 180 degree adapters with these hinges for the same effect. These are found here: 180° Adapter . In either case, 'cocking' the hinges will 'pull' the gate(s) towards the hinge post. This will sometimes cause the gates to no longer fit the opening they were originally made to fit. There is no way to prevent this and accomplish what you wish to accomplish. You may need to reset your gate posts. As far as I know, there is no off-the-shelf hinge that will solve your problem without some modification.
Updated 06/02/06
Where can I find the hardware I need for my gate?
Applicable Products:
All Gates
Reply: Thank you for your interest in our gate hardware. Without knowing what kind of gate you have, it is hard to recommend the hardware you need. We carry gate hardware for all types of gates. Just check out this page and it will guide you to the type of hardware you will need for your particular situation. Gate Hardware
Updated 06/02/06
Do you sell a vinyl gate for an opening other than the standard 50" gate found in your vinyl fence section?
Applicable Products:
Vinyl Gates
Reply: No we don't but...we do sell vinyl gate kits. These kits can be made to fit any size opening up to 5' with a single swing gate and 10' for a double swing gate. The kits consist of the gate uprights, diagonal brace, hinges and latch. A fence section will have to be ordered to complete the gate. You can find these kits by choosing a fence style you want to match, follow links to prices and choose "gate kit" from the price list. While you're there, don't forget the fence section. Our vinyl fence section can be found here: Vinyl Fence. More information on gate kits can be found here: Boxed Gate Kits. Naturally, we would recommend buying a standard 50" gate, but if you want a size other than that you will need to make your own gate using the gate kit.
Updated 06/02/06
Choosing the Size of Gate for Your Fence Project
In general, gate widths should be kept to a minimum. Regardless of if you are shopping for a gate for a small backyard fence or a commercial facility, choose a gate size based on its use. For residential use, you will need to consider and possibly check the measurements on the following:
To sum, gates are the only part of the fence which move. They are also the only part of the fence which tends to get abused. Years of experience have taught us that the smaller the gate - the better. Smaller gates will last longer, be less finicky years later, and cheaper to replace should they ever fail or get damaged. As far as expense is concerned, in many case it makes very little difference. For example, if you need 10' of fence with a man gate, you can order 7' of fence with a 3' gate or 6' of fence and a 4' gate - the net result is you need to cover 10'; you can install less gate and more fence or vice versus. Aluminum and vinyl fence sections are sold in sections, 6', 7-1/2', and 8' wide depending on style. Plan locations and widths of gates to eliminate waste and cutting sections down to size.
- Lawn Care Maintenance Equipment and Pedestrian Gates: Typically 3' wide gates are sufficient for push mowers; riding lawnmowers usually require 4-5' wide openings. Wheelbarrows can require a 4' wide opening. Always measure these items and any others you want to push, pull, and carry through the gates. Also keep in mind doors in most houses are only 36" wide. All sorts of large cumbersome items can fit through these openings.
- Driveway Gates and Vehicle Access Gates: Consider that most highways are only approx. 10' wide. People have no trouble driving 65 MPH+ on a 10' wide road. Most driveway gates are 10' or 12' wide, however some are larger. Larger driveway gates are often installed because a vehicle will not or cannot pull in straight; vehicles will be turning as they drive through the gate opening. This is especially important for vehicles pulling trailers and boats.
- Semi-Annual Traffic: Frequently our customers have wanted larger gates for the septic tank truck or to be prepared in case they need to get a backhoe in for repair. This is excellent forethought, however a large gate can be unnecessary and add extra cost to your project. In such instances where a gate only needs accessed a couple times a year, consider installing 2-3 removable sections of fence. This can be done at a modest cost and it is not any more laborious than installing the fence to begin with. There is more than one way to do this, the method is dependent on the style of fence being installed. For aluminum and vinyl fence, it is frequently done by cementing sleeves in the ground flush with grade in lieu of the posts. These sleeves, which can be made from galvanized steel, aluminum, or treated lumber, are approx. 18" long. They are slightly larger than the fence posts so that the fence posts can slide into them. Shim post(s) if necessary. Once fence post sleeves are cemented in the ground, install the fence as usual only for one or two posts, slide these into the sleeves versus cementing in ground. To remove section of fence, remove the horizontal rails, remove section fence, and remove post.
To sum, gates are the only part of the fence which move. They are also the only part of the fence which tends to get abused. Years of experience have taught us that the smaller the gate - the better. Smaller gates will last longer, be less finicky years later, and cheaper to replace should they ever fail or get damaged. As far as expense is concerned, in many case it makes very little difference. For example, if you need 10' of fence with a man gate, you can order 7' of fence with a 3' gate or 6' of fence and a 4' gate - the net result is you need to cover 10'; you can install less gate and more fence or vice versus. Aluminum and vinyl fence sections are sold in sections, 6', 7-1/2', and 8' wide depending on style. Plan locations and widths of gates to eliminate waste and cutting sections down to size.